The Yoke Squat Bar is a great piece of homemade equipment for training at home.
Training at home can often mean a lack of available equipment due to space or budget.
And that is where THIS homemade piece of equipment comes in...it's designed for SAFE barbell squats with NO rack and NO squat stands...and it's made entirely out of plumbing pipe, available at any hardware or home improvement store.
---
IMPORTANT
Now, I know this is common sense, but just to be clear up front, if you choose to build and use one of these bars, it is COMPLETELY AT YOUR OWN RISK. You assume full responsibility for using it safely and making sure it's put together solidly. Everything written here is for informational purposes only.
And strong as plumbing pipe is, keep in mind this is a bar made from items that are not designed to be used in this fashion. So if you decide to make one and use it, always inspect it before each use to ensure it's in good working order.
I think you get the point...which is to use your brain...
|
What Is It?
The Yoke Squat Bar is designed for "bottom start" squats (a.k.a. Anderson Squats). Starting from the bottom removes all elastic tension from the muscles at the start of every rep, forcing your actual MUSCLES to do the work.
This develops great strength out of the bottom of the squat. It was a favorite of legendary strongman Paul Anderson, hence the name.
You get under the bar at the bottom then push it up from the floor, instead of starting at the top and coming down then back up.
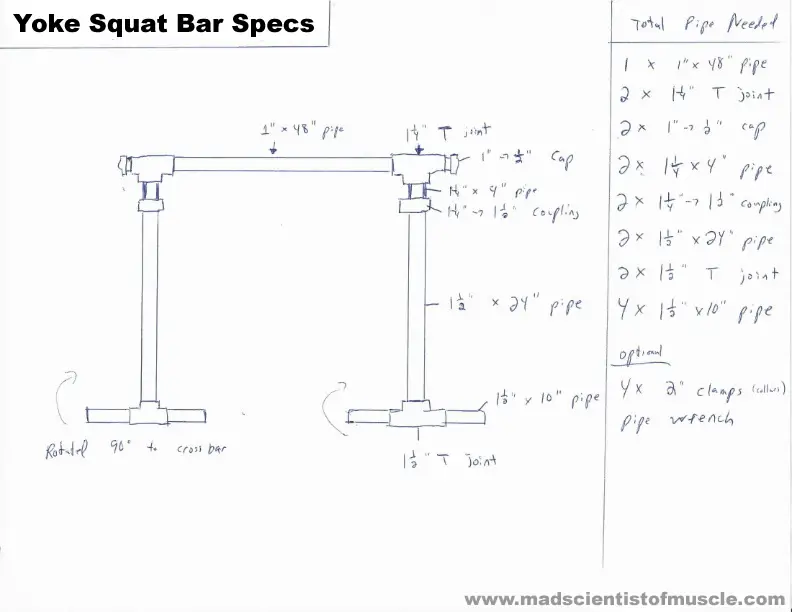
Here's what the bar looks like...(I'll have full specs and required equipment below).

Essentially, it's a bar with two posts hanging down from it. The posts are loaded with weight plates.
Here is a close-up view of where the vertical posts connect to the "bar" part of the bar. This is a "T" junction that is slightly larger than the size of the horizontal bar, allowing the bar to go THROUGH the T junction so it moves (swings) freely while you're doing the exercise.
This increases the stabilization component of the exercise while allowing for rotation of the bar. A fixed bar would have a tendency to rotate and slide down your back as you come up, which is why I opted for this "through" arrangement rather than just connecting the bar directly to the T joint..

There is a simple cap on the end of the bar to keep it from sliding back through (this is a 1" down to 1/2" cap).

Below the T joint, I have a short section of pipe. The purpose of this was to get the correct height for starting the movement with. The long piece below is 24"...a 36" pipe was too long and shortened the range of motion too much.

This coupling also serves a dual purpose...changing the size of the pipe.
The 1" horizontal bar is the same diameter as a normal Olympic bar. The size of T joint piece that it fits through best is 1 1/4"....however, the size of the hole of an Olympic plate is 1 1/2"...a 1/4" difference.
This short piece of pipe is 1 1/4" inches in diameter, to fit onto the bottom of the T joint.
The coupling is 1 1/4" on the top end and 1 1/2" on the bottom end, which the long 24 inch, 1 1/2" diameter piece fits into.
Here's a close-up view of the bottom section, where the plates are loaded. The design does require 4 plates to be loaded for stability on the floor (these can be any size...just be aware that the smaller the size of the plates, the lower the bar will be to the ground for the start position).
It's a simple T junction piece that fits onto the end of the long pipe, with two 10" pipes sticking out both ends.

Olympic plates will fit perfectly on these pipes, however normal spring collars will not...they're a bit too big.
The cheap fix is to grab 4 spring clamps at the hardware store (2" size - just a couple of bucks each) and use those.


These work fine, however, if you want something more solid, you'll need to spend a bit of money and get some collars that lock down to a bit smaller size.
I've got a couple of LockJaw collars on for this and they do the job nicely.
That's the bar!
I've got full specs and dimensions in the graphic below (again, for informational purposes only!). I find the pipe wrench makes it a lot of easier to tighten up the pieces.

How To Use It
This is where the fun begins.
First, load the bar evenly on all four posts. The weight of the bar I made works out to be about 48 lbs, which is not much different than a normal bar, so weight can be calculated pretty much the same.
I've got 4 plates on here, which totals about 228 lbs.
First, I duck my head under the bar. You'll notice I'm wearing a pair of work gloves...this is because the rotating vertical posts could potentially pinch the hands if your hands are too close in. The gloves prevent that (and yes, normal training gloves would be fine, too).

Then I get the bar set on my back in the normal squat position.
You'll notice that I'm not starting in the "full squat" position for these. That is one of the hitches with the bottom-start method...it's tough to get down under the bar in a very deep squat.

Then I stand up, just like coming out of the bottom of a regular squat. You'll notice with this setup that the weight tends to shift forward a bit, because of how it hangs directly down.
Also, because the vertical posts swing freely, this will place substantial demands on balance during the squat (another benefit).

I'll come all the way up, then lower down under control so I don't drop the weight onto the floor. This is great practice for performing normal squats under control sitting down in the hole.

The bottom can be a full stop (my preferred method, which allows me to fully reset my body position for optimal form) or "touch and go," which takes no tension off and does give some elastic energy return, similar to a regular squat.
Here's a back view of the exercise. I've added four 25-lb plates for a grand total of 328 lbs.

In terms of loading, I definitely recommend evenly loading the bar on all four posts.
It IS possible to add just 5 lbs to the BACK posts in order to go up in smaller increments, though, i.e.. if I wanted to add just 10 pounds to the bar, I would put two 5 lb plates on the back posts only. This still works fine balance-wise and can actually help with the weight shift backwards to involve the glutes/posterior chain more in the squat.
This bar is also very effective for Front Squats, allowing me to get in position under the bar (either cross-arm grip or clean racking style).


I've also done partial-range Zercher Squats with this bar, though I could potentially use shorter vertical posts to increase the range of motion.


The Bottom Line
Bottom-start squats are an AMAZING exercise for developing power out of the hole in the squat. By eliminating the elastic energy, you force the muscles to do ALL the work.
This unique homemade bar setup works like a charm for me...I leave weight on it all the time so that I can just squat whenever I feel like it without having to set up the bar in the power rack. Specifically, I've done a cycle of Progressive Resistance Daily Specialization Training with it, working up to sets of 20 reps with 350+ pounds on the bar.
And I know I'm hammering this point...but if you decide to build one of these and use it, PLEASE use common sense and be careful with it, just as you would ANY piece of training equipment.
![]()
More From Fitstep.com
| How Do I Build a Bigger Butt? | |
| Unleash Your Metabolism With Fat-Loss Circuit Training | |
| 8 Easy Exercises You Can Do At Home | |
| How to Gain an INCH on Your Arms in 6 Minutes |
Share This Page...
---
Home -> Muscle and Strength -> Training Equipment Reviews -> Pipe Yoke Bar


